Downward Dog, or Adho Mukha Svanasana in Sanskrit, is one of the most iconic and widely practiced poses in yoga. It appears in nearly every yoga session, whether in a flow class, a restorative practice, or as part of a warm-up. This pose is an essential foundational posture that serves to stretch and strengthen multiple muscle groups, promote alignment, and improve overall flexibility. For beginners, it may seem daunting at first, but with proper guidance and practice, it becomes an accessible and highly beneficial posture.
In this article, we’ll explore the proper technique for performing Downward Dog, its benefits, common mistakes to avoid, and tips for beginners to get the most out of this essential yoga pose.
1. Understanding the Basics of Downward Dog
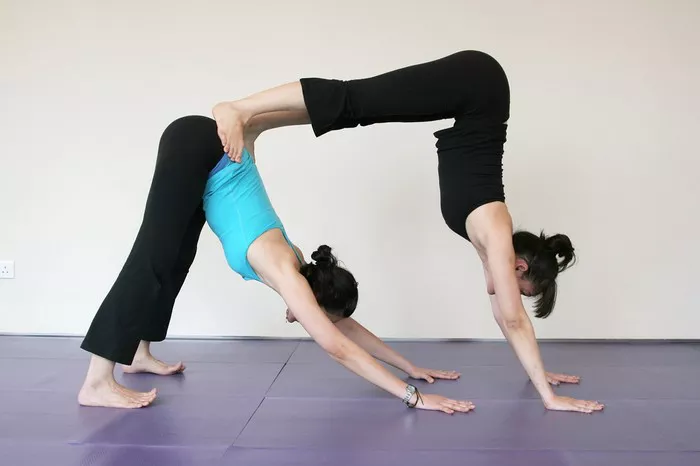
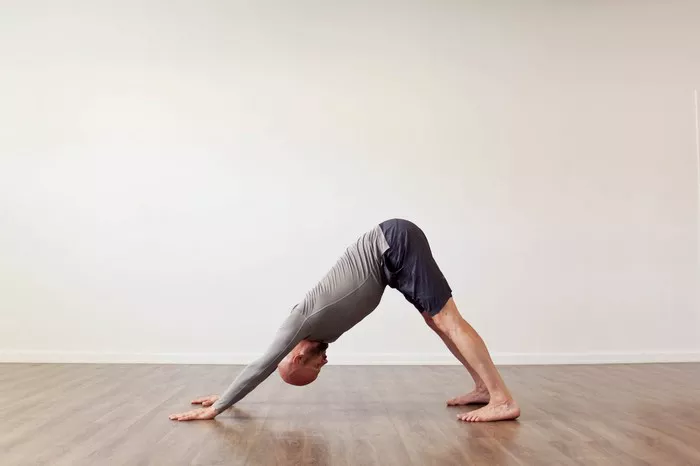
Downward Dog is a dynamic, full-body stretch that primarily targets the shoulders, hamstrings, calves, and spine. The pose takes its name from the way a dog stretches when it bows down, with the body forming an inverted “V” shape. When done correctly, Downward Dog can help release tension, increase blood flow, and prepare the body for more intense yoga poses.
Before attempting the pose, it’s essential to understand its core mechanics:
Hands: Press firmly into the mat, with the fingers spread wide and the palms pressing down.
Feet: Keep your feet hip-width apart and press them gently into the floor, although it’s normal for beginners not to have their heels touch the ground.
Hips: Lift the hips towards the ceiling, creating the shape of an inverted triangle.
Spine: Keep the spine long and straight, engaging your core muscles to maintain stability.
Head: Keep your head between your arms, with your neck relaxed, looking down toward your knees or the floor.
When performed with proper alignment, Downward Dog creates a feeling of lengthening through the entire body.
2. Step-by-Step Guide to Performing Downward Dog
Step 1: Begin in Tabletop Position
Start by coming to a tabletop position with your hands and knees on the mat. Your wrists should be directly under your shoulders, and your knees should be directly under your hips. This is your base position, or neutral spine, where your back is flat and your body is aligned.
Step 2: Spread Your Fingers and Press Into the Mat
Spread your fingers wide, and press the pads of your fingers and palms into the mat. Engage your arm muscles by slightly rotating your upper arms outward. This helps to create stability in your shoulders, preventing them from collapsing inward. Your wrists should be actively pressing into the floor, creating a strong base to support your body.
Step 3: Tuck Your Toes
Begin by tucking your toes under, preparing to lift your hips into the air. This will engage the muscles in your legs and core and prepare your body for the inversion.
Step 4: Lift Your Hips
On an exhale, gently push your hips toward the ceiling. As your hips rise, try to form an inverted “V” shape with your body. Your hands should remain firmly planted, while your feet press down, lifting your hips as high as possible. Think of your hips moving upward and backward, rather than simply raising them.
Step 5: Straighten Your Legs
As your hips lift, work on straightening your legs. At first, your knees may remain bent, and that is perfectly fine. The key is to keep the hips elevated and the spine lengthened. Over time, as your flexibility increases, you can gradually straighten your legs. However, don’t force your legs straight if your hamstrings are tight.
Step 6: Engage Your Core and Lengthen Your Spine
While in Downward Dog, engage your core muscles to prevent your lower back from sagging. Imagine pulling your belly button toward your spine. This engagement will help to lengthen your spine and protect your back from injury. Ensure your back stays straight, avoiding the temptation to round your back excessively.
Step 7: Relax Your Neck and Gaze
Let your head hang naturally between your arms. Keep your neck in a neutral position by relaxing your neck muscles. You can look toward your knees, the floor, or between your legs, but keep the gaze soft to avoid straining your neck.
Step 8: Hold and Breathe
Stay in the pose for 5 to 10 breaths, or longer if comfortable. Focus on breathing deeply, allowing your chest to move closer to your thighs with each exhalation. With every inhale, feel the space in your spine lengthen. Don’t rush the pose; instead, work to deepen your stretch over time.
Step 9: Exit the Pose
To come out of Downward Dog, slowly bend your knees, and lower your hips back to the tabletop position. Alternatively, you can drop your knees to the floor in a Child’s Pose to rest. Always move slowly and with control when transitioning out of the pose to avoid injury.
3. Key Alignment Tips for Beginners
For those new to yoga, proper alignment can be tricky. Misalignment can lead to discomfort or even injury over time. Here are some key tips to keep in mind:
Hand placement: Ensure that your hands are shoulder-width apart, with your fingers spread wide. This will provide a solid foundation. Press down through the knuckles and the base of the palms.
Foot placement: Keep your feet hip-width apart, with the toes pointing forward. Avoid letting your feet splay out to the sides. If your heels don’t touch the mat, that’s okay. Focus on lengthening your spine and lifting your hips.
Spine: Keep your spine long, not rounded. Engage your core muscles to avoid collapsing your lower back, which can lead to discomfort in the lower back and hips.
Shoulders: Your shoulders should be aligned with your wrists. Avoid letting your shoulders creep up toward your ears—keep them relaxed and broad, creating space in your neck.
Neck: Keep your neck relaxed, with your head between your arms. Don’t allow your head to drop too low, which can strain your neck. Keep your gaze soft.
4. Common Mistakes to Avoid
While learning Downward Dog, beginners often make several common mistakes. Recognizing these errors will help you improve your practice and avoid strain or injury.
Collapsing the chest: A common mistake is letting the chest collapse toward the floor. Instead, focus on lifting the chest toward the thighs and lengthening your spine. Keep your ribs engaged and avoid letting the belly hang down.
Over-straightening the legs: Beginners often try to straighten their legs before their hamstrings are ready. While straightening the legs is a goal, it’s more important to focus on creating a long spine and lifted hips. Don’t force your legs straight if it causes discomfort.
Rounding the back: Another common mistake is rounding the back, especially in the upper back. This is often a sign of tight hamstrings or a lack of core engagement. Keep your spine long and think of reaching your chest toward your thighs as your hips lift toward the sky.
Wrist pain: If you experience pain in your wrists, it could be due to improper hand placement. Make sure your fingers are spread wide and that you are not putting excessive weight on the wrists. You can also use yoga props, like wrist pads or blocks, to reduce pressure.
5. Benefits of Downward Dog
Downward Dog is a highly beneficial pose for your body and mind. Here are some of the key benefits:
Strengthens the upper body: Downward Dog helps to strengthen the arms, shoulders, and wrists as you hold the position and press into the mat. It also works the core muscles, as you engage your belly to maintain the shape of the pose.
Stretches the lower body: The pose provides a deep stretch to the hamstrings, calves, and hips, making it great for improving flexibility in the lower body. The stretch along the spine helps to lengthen the back and relieve tension.
Improves posture: By creating space in the spine and strengthening the back, Downward Dog helps promote better posture in both your yoga practice and daily life.
Relieves tension: Many people hold tension in the neck, shoulders, and lower back. Downward Dog helps to release these areas by stretching and lengthening the muscles and encouraging deep breathing.
Increases circulation: Inverting the body can help improve circulation by allowing fresh blood to flow toward the heart. This can help energize the body and rejuvenate the mind.
Calms the mind: Holding a stable pose like Downward Dog promotes mindfulness, grounding, and relaxation, helping to calm the nervous system and reduce stress.
6. Modifications for Beginners
If you find the full Downward Dog pose challenging, there are several modifications you can try:
Bend your knees: If your hamstrings are tight, bend your knees slightly to prevent straining your lower back or legs. This will also help you focus on lifting your hips and lengthening your spine.
Use props: Place a block under your head or hands for additional support if your shoulders or wrists are sensitive.
Wall Downward Dog: If balancing in Downward Dog on the floor is too difficult, try performing the pose with your hands on a wall. This modification reduces the intensity of the pose while still providing many of the benefits.
Child’s Pose: If you need to rest, come into Child’s Pose (Balasana). This is a great way to release any tension in the back or shoulders.
Conclusion
Mastering Downward Dog as a beginner takes patience and practice, but the benefits are well worth the effort. With a focus on alignment, breath, and proper technique, you can build strength, increase flexibility, and find deeper mindfulness in your practice. Keep in mind that yoga is a journey, and every practice is an opportunity to learn and grow. Don’t rush or force yourself into the full expression of the pose. Instead, honor where you are and enjoy the process of improving your Downward Dog. Over time, you will notice the increased mobility and strength that comes with this foundational yoga pose.
Related Topics:

